
Answer
You can view a how-to video for this topic here.
Question: How should a Benefit Plan be created and setup using the HR Management Module?
Solution:
Setting up a Plan involves both the Payroll Module and the HR Management Module. Matching benefit and deduction codes are created in Payroll and the Benefit Plan is created in HR Management. The benefit plan is assigned to employees in HR Management.
Benefit Plans connect Payroll’s Benefit code and a Deduction code into a unified HR Benefit Plan. Once the plan is established and entered on the Benefit Plan tab for an employee, calculating payroll produces the correct benefits and deductions associated with the plan.
Use the following steps to set up a Benefit Plan. Please note that these steps are for a plan that is associated with both a benefit and a deduction code. A benefit plan does not require both and can be created using solely a benefit code or a deduction code.
1. Set up the matching Benefit code and Deduction code in Payroll. You must have a Benefit code and an Deduction code with identical code ID’s established in Payroll. On the Calculation tab for both Benefit and Deduction Codes, select the Calculation Method of either Amount on Timesheet or Percentage on Timesheet. They must be the same.
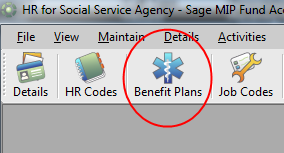
2. Set up the Benefit Plan in HR Management.
Select Maintain>Benefit Plans
On the General tab, select the Benefit Code that was created in the Payroll Module.
Select the Benefit Type. The Benefit Type choices will be the same choices available in the code tables. For details on setting up code tables, see KB 10461.
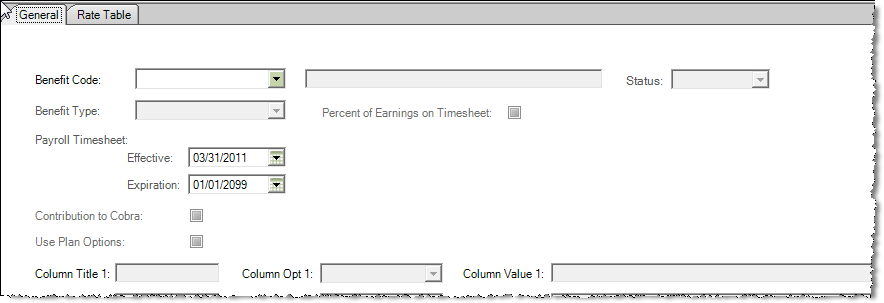
Set the status to Active. By default, all Benefit plans are initially set to inactive. (Note: If you are not immediately using that Plan in a payroll calculation, enter the rest of the information below but return to the Benefit Plan and set the status to Inactive until you are ready to calculate the plan.)
If Percent of Earnings was selected when the Benefit code was created, the check box for Percent of Earnings on Timesheet will be pre-selected. If using Amount on Timesheet, leave this box unchecked.
Benefit Plans have Plan Level Effective (start) and Expiration (End) dates.
Edit the Payroll Timesheet Effective and Expiration dates. You may choose a future effective date for a plan. For example, if employees are not eligible for health benefits for 90 days, you may set the start date for 90 days in the future.
Select the Contribution to Cobra check box, if applicable.
Select the Use Plan Options check box, if applicable. See KB 10461 for complete steps to creating Plan Options. You will not use Plan Options if you are using Percent of Earnings on Timesheet as the calculation method.
Enter the Column Titles for the Rate Table Tab. These are additional columns that you may want to add to the rate table.
Enter the Rate Table info. KB 10461 for details. The Rate Table information must match the values set up in the Code Tables.
Click the Save button and close the form.
3. Add the Benefit Plan to each Employee.
By adding the Plan to each employee, the corresponding Benefit and Deductions are calculated during the Payroll calculation by selecting UpDate Benefits

In HR Management, open the Details>Employee Information Form. Select an Employee.
Select the Dependents tab. Enter Dependent information by selecting a Relation, entering a Name, Birthday, Gender, and Social Security Number.
Select the Benefit Plans tab.
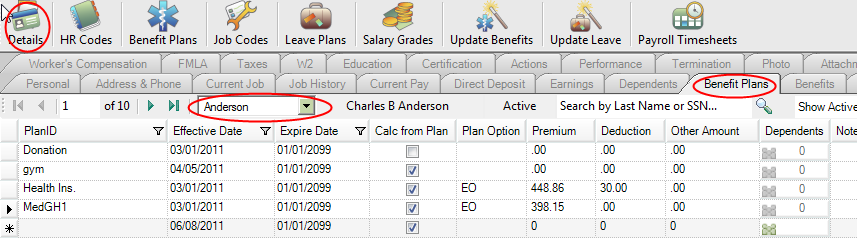
Select the PlanID. The Effective Date and the Expiration Date will populate from the Benefit Plan.
Select the Plan Option. If you set the Options up correctly per KB 10461, the options will be available to select from a drop-down box.

Complete the Premium, Deduction, and Other Amount information. If you are using the Calc from Plan option, you will not need to enter the Premium or the Deduction.
If multiple Dependents are available, click the icon in the Dependents column. A Dependent Benefits table displays.Select the Dependents that are participating. Click OK.
Repeat this process for each PlanID for whichever dependents are participating.
Once complete, click the Save button and close the form.
Return to the Benefit Plan and set it to Inactive until you are ready to use it.
Article Type
Product Info
Product Line
MIP Fund Accounting
MIP Cloud/Login.mip.com
Product Module/Feature
HR Management
Product Version
2021.1.0
2020.3.3.0
2020.3.1.0
2020.3.0.1
2020.3
2020.2
2020.1.4
2020.1.2
2020.1.1
2020.1.0
2020.1
2019.3.1
2019.3
2019.2
2019.2.0.1
2019.1.4
2019.1.3
2019.1.2
2019.1.1
2019.1
2018.1.6
2018.1.5
2018.1.4
2018.1.3
2018.1.2
2018.1.1
2018.1
Ranking